Q: I want to import time clock hours to Certiflex from an Excel spreadsheet. How do I do that?
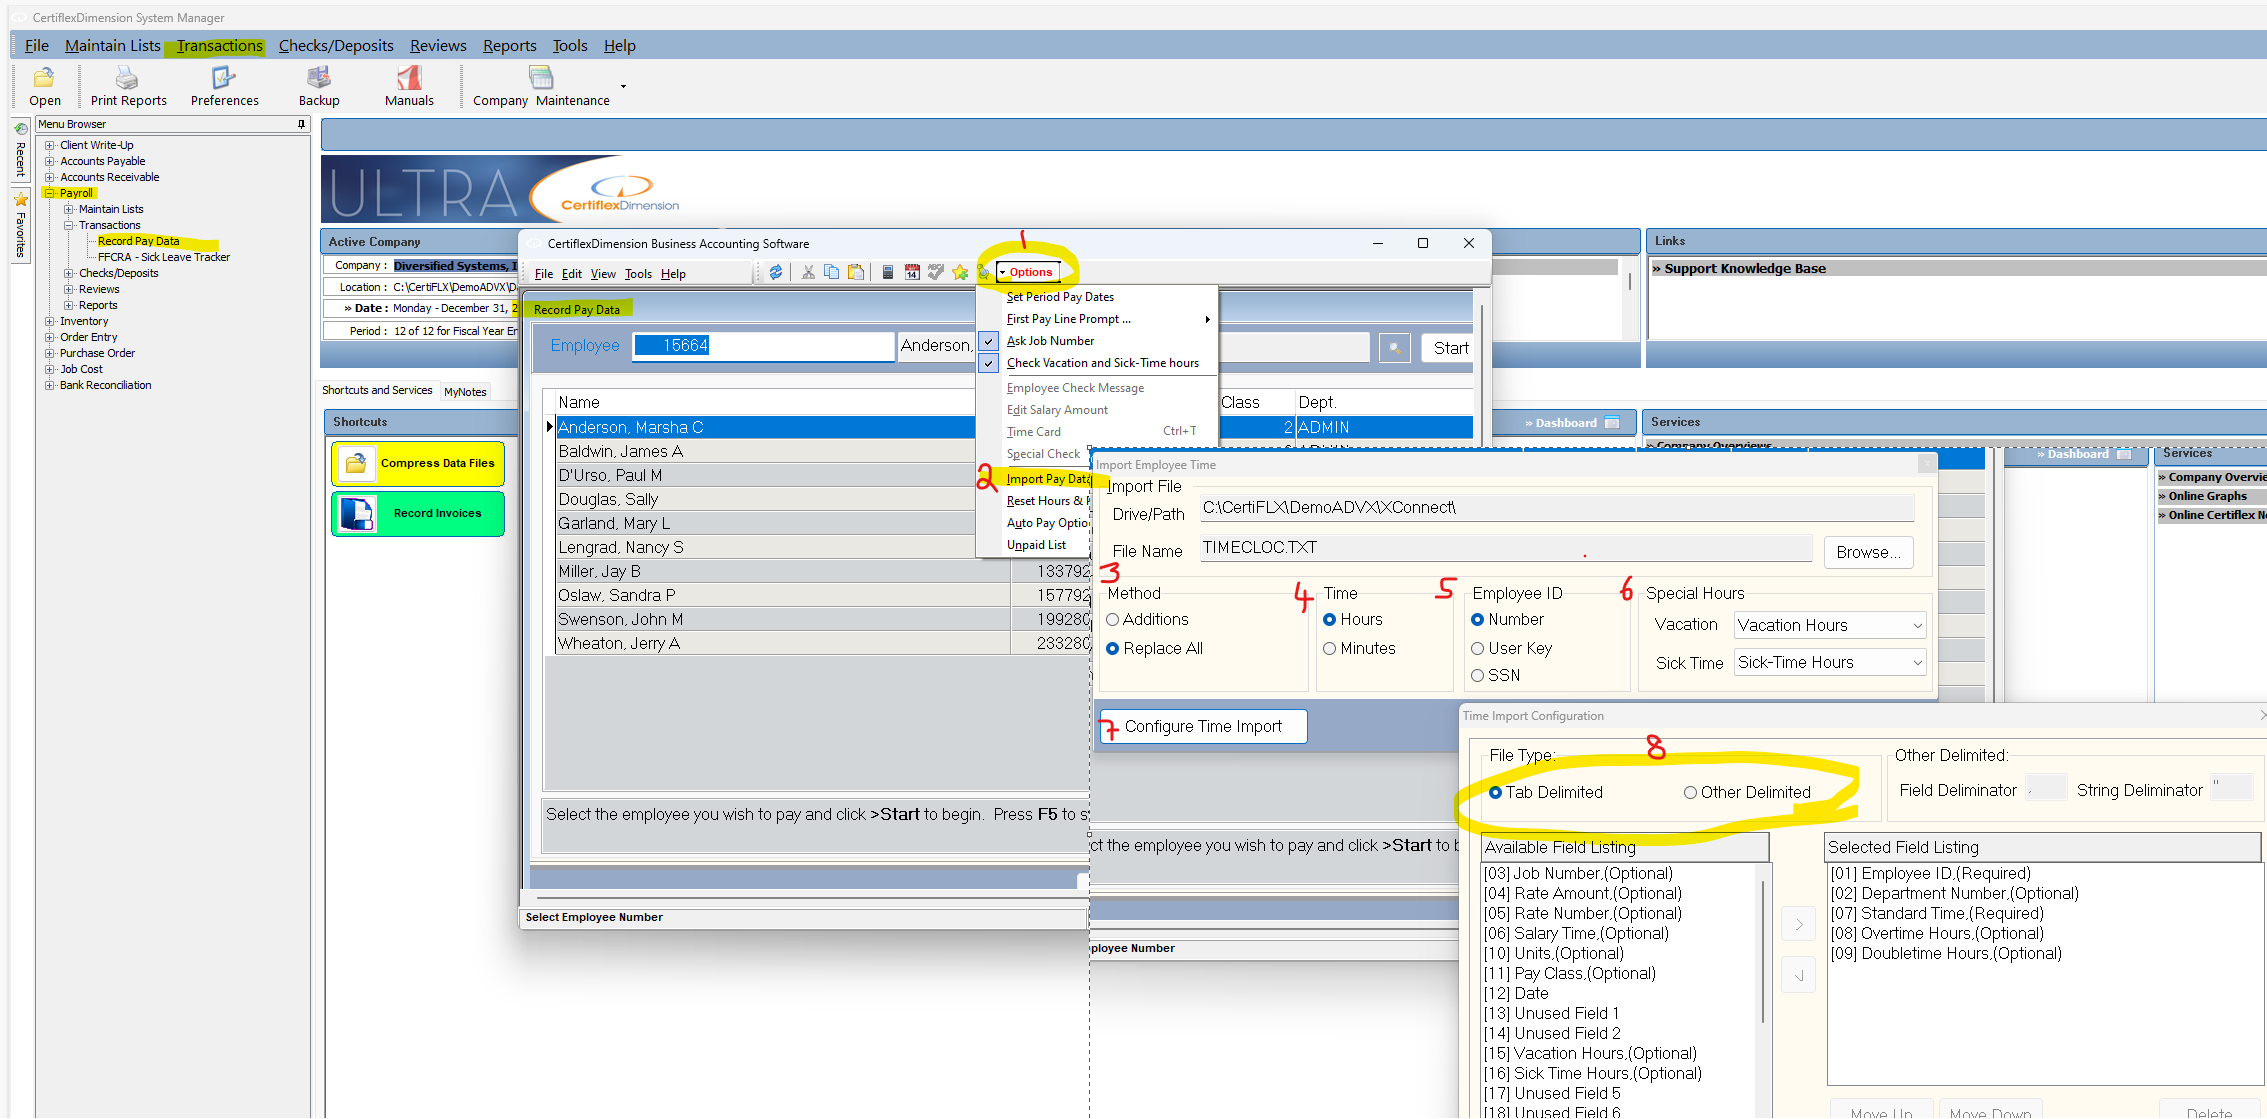
A: The Import Pay Data feature under the Options menu will allow you to import hours detail from third party software into the Record Pay Data system. After importing, you may select the Auto-Pay option to validate all paid employees to complete the pay cycle for the imported time. To start, export the time clock data from the third-party application to a file on your computer, then go to >Payroll >Record Pay Data and click on Options [1]. From the drop-down menu, select Import Pay Data [2]. By default, the import file path will show the …\ADVX\XConnect\ folder with a filename of timecloc.txt. To change any of this information, click >Browse, then change the drive/path assignments, and/or the filename to the location, and name of the file with your time clock data in it. Next set the Method, Time, and Employee ID to be used.
- Method: [3]
Additions: Select this option to add the imported hourly pay data to the existing hours of an employee. Please be aware that this option will delete any additional pay codes you may have entered for an employee.
Replace All: Select this option to replace all pay data for any employee containing hourly pay detail in the import file. - Time: [4]
Hours: Select this option if the time in the file being imported is in hours.
Minutes: Select this option if the time in the file being imported is in minutes. - Employee ID: [5]
Number: Select this option if the employee ID in the file being imported is the employee’s number.
User Key: Select this option if the employee ID in the file being imported is the employee’s user key
SSN: Select this option if the employee ID in the file being imported is the employee’s Social Security Number. - Special Hours: [6]
Vacation: If you are importing standardized vacation time (Vacation hours), select the Vacation Hours table to use for all employees.
Sick Time: If you are importing standardized sick time (sick time hours), select the Sick Time Hours table to use for all employees.
The first time you use the system, you will need to configure the importer to correctly match your time clock system exporter. The CertiflexDimension Ultra Time Clock importer is extremely flexible in the way it can read time-card entries, but you will need to know how your time clock system is configured to export data. For more information on how your specific time clock system exports data, please contact your time clock vendor. Once you know the style and order that your time clock system exports data, you can change the CertiflexDimension Ultra Time Clock importer to match the export format. To configure the CertiflexDimension Ultra importer, click >Configure Time Import [7]. The first and most important part of configuring Import Pay Data is selecting the correct File Type [8]. You must select one of the following:
- Tab Delimited: Many popular spreadsheets and databases use this type of file. Tab delimited files separate fields within records by a Tab or CHR (9), where a Tab or CHR (9) separates the different data fields.
- Other Delimited: This file type uses a consistent character other than a Tab to separate the fields within each record. When selecting Other Delimited file type, you must also select the character used for the field delimiter. The most used characters are commas or asterisks. Some software also includes an extra character around text fields called a String Delimiter. String delimiters are almost always double of single quotation. The Import Pay Data configuration window displays two lists of data. The Available Field Listing containing the list of fields that Import Pay Data could use. The Selected Field Listing contains the active list of fields that Import Pay Data will use to gather data. You must have Employee ID and Standard Time in your file Selected Field Listing. To move a data field from one list to the other, highlight the field by clicking on it and use the appropriate arrow key to complete the transfer. If you delete a field from the Selected Field Listing, it will automatically return to the Available Field Listing. Make sure the order of the data fields match the data exported by your time recording. Use the Move Up or Move Down button to change the order of the fields.
NOTE: If the data contains unwanted fields, mark the position(s) with an Unused Field from the Available Field Listing. - Any fields that say Optional beside them, and are not on your selected field list, will be set to their defaults. For example, if the department number is not defined, it will take the department number from the employee record. If the rate and rate amount are not defined, the system will look for the rate for the department. If it does not find one, it uses rate 1 on the employee. Once you have configured it to match the fields in your file, click >Save.
Example – Your time clock system exports an employee number, employee name and standard minutes. Since Dimension does not need the employee name, you would set your selected field list to be:
[01] Employee ID
[13] Unused Field 1
[07] Standard Time
Once you have configured the time importer to read your file, click >Start to begin processing your file. If the system detects any errors in your file, a window will appear, showing you a list of the invalid data. You will see a description of the error, what data was invalid, and the error type. If you have only non-critical errors, you may choose to Continue or Cancel. If you continue, you will get default data for any information that it could not find. After importing, you may select the Auto Pay option to Validate All Paid Employees to complete the pay cycle for all imported time.
(For larger Image: right-click-image & open in new tab)